I got a bit worried on the flight back from ATL this week. The pilot reported we were traveling at 701 mph. All the the aircraft listed in the seat back pocket guide have maximum speeds under 500 mph...
This would still be 609 nautical miles per hour. (Just in case the specs were intended to be listed that way)
Saturday, December 5, 2009
Monday, November 16, 2009
Things I hate about my Nissan Dealer
Everytime I take the car in, I feel like they do more harm than good.
Here's my list of gripes:
Oh wait, almost forgot.
Here's my list of gripes:
- Sending us home with 19psi in all 4 tires
- Having to bring the car in 5 times before they felt like actually fixing the noisy front bumper
- Leaving greasy fingerprints all over the ceiling while fixing the dome light
- Pretending they know how to patch my tire, only to have the plug fall out the next day
- Charging hundreds of dollars a year for their bad service which is required to keep my warranty
Oh wait, almost forgot.
- Making you wait around for hours so they can close a car deal with you late at night while your baby is crying and it's hard to concentrate on what they're saying.
Monday, August 24, 2009
93 Del Sol - Dying Starter?
Watch the video. Oddly enough, it happened after adjusting my timing belt. You can feel the resistance when rotating the crank manually with a ratchet.
I'll be pulling the starter out tonight to see what it looks like. The thumping sound is just the ratchet hitting the back of the bumper.
I'll be pulling the starter out tonight to see what it looks like. The thumping sound is just the ratchet hitting the back of the bumper.
Thursday, August 6, 2009
Finally switched to an optical mouse
I hated them for gaming when they first came out, but the Logitech MX518 finally won me over.
It's longer and taller than the MS Intellimice I'm used to using so I had to get a wrist-rest. However, after a week I'm officially mechanical mouse free.
I think my UT3 scores might have actually improved, and I love the extra sensitivity for desktop use.
Best part is, no more cleaning those rollers. :-)
My travel thread
I figured I should write down the places I've visited before I forget. Time can be cruel to your memories.
This is not written in order of preference! I'm not counting places I drove through or flew through.
1. San Francisco, CA
2. Clearwater, FL
3. Pensacola, FL
4. Orlando, FL
5. Point Judith, RI
6. Manhattan, NY
7. Washington, DC
8. Bethesda, MD
9. Pawtuxet, RI
10. Alexandria, VA
11. Harrisburg, PA
12. Hanover, PA
13. Boulder, CO
14. Salt Lake City, UT
15. Weeping Water, NE
16. Las Vegas, NV
17. Niagra Falls, Canada
18. Warner Robins, GA
19. Chicago, IL
20. Paris, France
21. Muenchen, Deutschland
22. Hanau, Deutschland
23. Chiemsee, Deutschland
24. Schwangau, Deutschland
25. Dachau, Deutschland
26. Philadelphia, PA
27. Herndon, VA
28. Chambersburg, PA
29. Dundalk, MD
30. Lancaster, PA
31. Block Island, RI
32. Berkeley Springs, WV
31. Vaihingen, Deutschland
32. Falls Church, VA
33. Frankenthal, Deutschland
34. Oswego, NY
35. Arlington, VA
36. Norfolk, VA
37. Auburn, PA
38. New Freedom, PA
39. York, PA
40. Waikiki, Hawaii
Fixing Internet Explorer 7
IE7 crashed today after I used the reset function in attempt to get RDP working.
The problem is, it will just keep bringing up the runonce page asking you to set your search engine etc every time you open Internet Explorer.
This happened in Windows XP Pro SP3 with all the latest patches thru 7/2009.
Here's the fix:
1. Start -> Run -> regedit.exe
2. Then open HKEY_CURRENT_USER/Software/Microsoft/Internet Explorer/Main
3. Create a New DWORD called RunOnceHasShown and give a value of 1
4. Create a New DWORD called RunOnceComplete and give a value of 1
5. Restart Internet Explorer
So much for Microsoft's lame attempt to ruin my workday. ;-)
Wednesday, August 5, 2009
Windows XP x64 Edition with VMware WS 6.5
So I maxed out my K9N2GM motherboard with 8GB of RAM, and noticed that VMware Workstation 5.5 wouldn't see past 4GB even when it was running under XP x64 Edition SP2.
I upgraded to VMware WS 6.5 and now my virtual machines can use over 7GB if I need it. The only issue I had was that my PC would suddenly reboot the first time I ran workstation and player.
If you're looking for an affordable and stable system to run VMware, I suggest reading my upgrade thread here:
http://purefinity.blogspot.com/2009/01/amd-athlon-x2-upgrade.html
I originally bought it more for gaming, but VMware runs great too!
Sunday, August 2, 2009
My JB Weld Thread
1. DIY oil restrictor fitting
2. Repaired weeping clutch master cylinder connection (hydraulic)
3. Used to attach a blow off valve to aluminum tubing (pneumatic)
This stuff is really impressive. :-)
2. Repaired weeping clutch master cylinder connection (hydraulic)
3. Used to attach a blow off valve to aluminum tubing (pneumatic)
This stuff is really impressive. :-)
Thursday, July 23, 2009
Blogger Blogspot Backup
I'm blogging this so don't forget. This is the URL to backup my blog in a readable format.
http://purefinity.blogspot.com/search?max-results=100
I also do an XML dump from the settings tab (export blog). This should work for all blogger/blogspot accounts.
http://purefinity.blogspot.com/search?max-results=100
I also do an XML dump from the settings tab (export blog). This should work for all blogger/blogspot accounts.
Wednesday, July 22, 2009
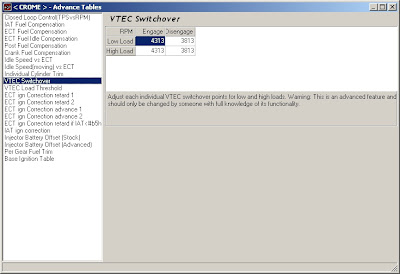
Honda ECU tuning with Crome
Got a B16 or D16 motor you want to tune with Crome? Here are some step by step instructions I used to tune my D16Z6 (ZIF socketed P28 ECU) with a turbo.
You can click any of the images in this article to see a larger sharper version of that image.
I've also found that bigger injectors and boost means the IAT compensation may be too aggressive and can create dangerous lean conditions. Therefore you may want to adjust the multiplier used at 151.5 and 284.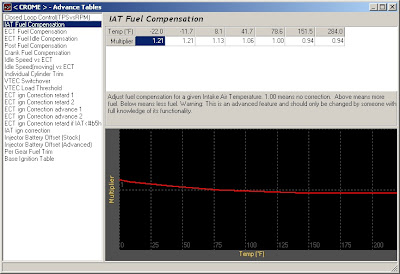
Other tips:
Happy tuning!
You can click any of the images in this article to see a larger sharper version of that image.
- Get the latest version of Crome. I used v1.53 which supports the latest boost and fuel tool code.
- Open Crome and select File -> New to start a new bin file.
- Since advanced boost tools are only supported on the P30 ROM, I need to first export a P28 map to import into a P30 ROM. This means I'll choose P28 as the ROM for now.

- Now export the P28 maps. File -> Export Tables

- Now start a new file with a P30 ROM

- Now import the P28 maps. File -> Import Tables

- Now would be a good time to remove the checksum routine and save your bin.

- Next you'll need to install fuel tools from the plugin menu. After that's installed press Ctrl+F to set your injector size. I'll be using 1st gen DSM 450cc injectors. So the new flow rating becomes 450.

- We'll also need to change the Injector Battery Offset by pressing Ctrl+L and choosing "Injector Battery Offset" (Stock). This ensures that the injectors keep performing as programmed even when there is more or less voltage than normal. If you can't find your injectors in the more dropdown, you'll need to figure out these values for yourself.

- Time for boost! Install the Advanced Boost Tools plugin from the Plugins menu. Most people with a stock MAP sensor will just need to keep clicking next through the defaults. When it's done you'll notice you have a lot more columns in your map.

- On my small .48 AR T3 turbo, I've elected to make the following boost tables adjustment. You can adjust these values as you see fit. I always like to keep a bin saved before the tables were adjusted so I can play around with different efficiencies and retard settings to test them out as different bin files. This menu can be accessed anytime by pressing Ctrl+B.

- Next, install the "Add Extra Features" plugin from the Enhancements section of the plugins menu. This allows you to set the options page as shown in the picture. The only extra feature I use is the Boost Limit (set at 10 PSI in case the wastegate fails), so I've disabled the other shift and launch features by setting them above the rev limit. Here you can set when to enable VTEC, and obviously the rev limit too.

- I've found that disabling the following sensors gives the greatest chance of success when running the ROM in an ECU.


- Disable knock sensor
- Disable atmospheric pressure sensor
- Disable injector test circuit
- Disable VTEC speed check
- Disable VTEC coolant temp check

I've also found that bigger injectors and boost means the IAT compensation may be too aggressive and can create dangerous lean conditions. Therefore you may want to adjust the multiplier used at 151.5 and 284.

Other tips:
- Remember to use a timing light and set your ignition timing at idle to match the timing used by the map (usually 16.5 degrees)
- Your first tuning session should be done with VTEC disabled so that the low cam is tuned properly. Then you can re-enable VTEC and do high cam tuning.
Happy tuning!
Wednesday, June 3, 2009
D16Z6 Turbo Del Sol
It's up and running, providing 192WHP@7PSI! With some more tuning I'm hoping for a 13.9s 1/4mi, but the engine is pretty tired at 200,000 miles. ;-)

Turbo:
Intake: 2.5 inch
Inlet: 2.25 inch
Compressor trim: .42ar
Compressor Wheel diameter: 43.20 / 60.41
Turbine Wheel diameter: 45.74 / 62.86
Exhaust Trim: .48ar
Turbine flange type: t3 flange
Down pipe flange type :4 bolt
Cooling type: oil cool only
Engine Management:
450cc DSM injectors with resistor box
P28 chipped with Crome
11.8:1 – 12.5:1 A/F Ratio
0.75 degrees of ignition retard per pound of boost (Static ign timing set to 16 @ 22inHG, 650RPM)
Denso Iridium IK20 spark plugs (One heat range colder, default gap)
Drivetrain:
OBX Helical LSD for D16
6 puck ACT disc
Exhaust:
Cast iron manifold
3in downpipe
2.5in exhaust with canister muffler
Hi-flow cat

-Specs-
Turbo:
Intake: 2.5 inch
Inlet: 2.25 inch
Compressor trim: .42ar
Compressor Wheel diameter: 43.20 / 60.41
Turbine Wheel diameter: 45.74 / 62.86
Exhaust Trim: .48ar
Turbine flange type: t3 flange
Down pipe flange type :4 bolt
Cooling type: oil cool only
Engine Management:
450cc DSM injectors with resistor box
P28 chipped with Crome
11.8:1 – 12.5:1 A/F Ratio
0.75 degrees of ignition retard per pound of boost (Static ign timing set to 16 @ 22inHG, 650RPM)
Denso Iridium IK20 spark plugs (One heat range colder, default gap)
Drivetrain:
OBX Helical LSD for D16
6 puck ACT disc
Exhaust:
Cast iron manifold
3in downpipe
2.5in exhaust with canister muffler
Hi-flow cat
Sunday, March 1, 2009
PowerLine Network Kit Review
I recently acquired a Dlink DHP-301 PowerLine HD Network kit and decided to run it through some performance tests in comparison to wireless. The kit lets you share your home network via any electrical outlet in the house.
http://www.dlink.com/products/?pid=533
Direct connection to ethernet switch on 3rd floor (I have a Netgear 802.11b/Ethernet switch)
Connection from 2nd floor
Connection from the 1st floor
As you can see from the tests, the powerline network devices yielded much better performance than 802.11b. Would newer wireless technologies equal or beat powerline networking? Perhaps, but I don't have the equipment to test them.
The advantages of powerline networking are that you can easily connect devices such as video game consoles and DVRs that only have an ethernet jack. It's also useful for government laptops that don't allow wireless. The performance will also beat wireless if there are alot of obstructions like reinforced concrete between floors.
The disadvantages are that powerline networking creates annoying interference for analog devices like baby monitors. It's also sometimes hard to find a free outlet near your devices. (You need an empty outlet, powerstrips won't work)
http://www.dlink.com/products/?pid=533
Direct connection to ethernet switch on 3rd floor (I have a Netgear 802.11b/Ethernet switch)
- 92mbps
Connection from 2nd floor
- Using 802.11b = 4.8mbps
- Using DHP-301 = 41mbps
Connection from the 1st floor
- Using 802.11b = 3.6mbps
- Using DHP-301 = 27mbps
As you can see from the tests, the powerline network devices yielded much better performance than 802.11b. Would newer wireless technologies equal or beat powerline networking? Perhaps, but I don't have the equipment to test them.
The advantages of powerline networking are that you can easily connect devices such as video game consoles and DVRs that only have an ethernet jack. It's also useful for government laptops that don't allow wireless. The performance will also beat wireless if there are alot of obstructions like reinforced concrete between floors.
The disadvantages are that powerline networking creates annoying interference for analog devices like baby monitors. It's also sometimes hard to find a free outlet near your devices. (You need an empty outlet, powerstrips won't work)
Friday, January 30, 2009
Simulating Network Delay Using Linux
In a previous blog post I documented how to create a router using Linux:
http://purefinity.blogspot.com/2008/10/making-linux-router-or-gateway.html
Now that we have that setup, we can use it to emulate WAN latency using netem. If you're running a 2.6 kernel you should already have it installed.
Keep in mind that this only works for outbound traffic, so choose your network interface accordingly.
To add 100ms to all outbound traffic on eth0
tc qdisc add dev eth0 root netem delay 100ms
To check status
tc -s qdisc
To remove the delay from eth0
tc qdisc del dev eth0 root
You can also use netem to simulate packet loss, variable delay and rate control. For more information on netem:
http://www.linuxfoundation.org/en/Net:Netem
If you're looking for an easy to use tool to test throughput and latency that is more sophisticated than ping, I recommend QCheck. You can install it on two Windows machines and test between those two points, or install QCheck on a Windows machine and an Ixia Endpoint on a Linux machine. Both QCheck and the Endpoint were available for free at the time this article was written.
http://www.ixchariot.com/downloads.html
I would like to note that my first choice to emulate network latency was to use tcmon from the Windows resource kit, but I quickly found the tool to be poorly documented, unsupported on Windows Server 2003, and only provided rate control on Windows XP. It's sad when a command line tool for Linux is simpler and easier to use than a GUI tool from Microsoft.
Wednesday, January 21, 2009
Howto disable autorun in Windows XP
Handy info!
- Click Start
- Click Run
- Enter GPEDIT.MSC
- Group Policy mmc will popup. On left panel:
- Double-click Computer Configuration to open submenu
- Double-click Administrative Templates to open submenu
- Double-click System to open submenu
- Double-click Turn autoplay off option which will be near the bottom of the list in the right panel.
- The default is the Not configured . Set it to Enabled.
Tuesday, January 20, 2009
L4d Server Basic Howto
Here's the steps I used to setup a Left4Dead server on my Windows Server 2003 box.
Step 1: Get the files to install the source dedicated server (I used C:\srcds as my dir)
http://www.srcds.com/
Step 2: Run hldsupdatetool and agree to the terms of use etc
Step 3: Update/Install your game
C:\srcds\hldsupdatetool.exe -command update -game "left4dead" -dir C:\srcds
Step 4: Create a server.cfg file in C:\srcds\l4d\left4dead\cfg to look like the following
// server
name hostname
// password for rcon
rcon_password ""
// Difficulty of the current game (easy, normal, hard, impossible)
z_difficulty normal
// Only allows connections from game
lobbies sv_allow_lobby_connect_only 0
name hostname
// password for rcon
rcon_password "
// Difficulty of the current game (easy, normal, hard, impossible)
z_difficulty normal
// Only allows connections from game
lobbies sv_allow_lobby_connect_only 0
Step 5: Run the game server
C:\srcds\l4d\srcds.exe -console -game left4dead +ip
Tips and Tricks:
- You can control your server by joining the game from a different machine and using rcon.
- Open the developers console by hitting tilde (enable it from keyboard setup first)
- Type: rcon_password
- Now that you're authenticated you can disable autokick by simply typing: rcon
- You can also change game settings and more by typing things like: rcon sv_cheats 1
- To see each player's latency just type: ping
- There are useful commands you can run from the console too!
- You can see when people type in the game, here's how to respond: say "blah blah"
- To kick a player: kick "playername"
- To shutdown the server: quit
- You need a public IP address bound to your server's NIC in order to host a game, here's how to do it while keeping your home network intact.
- First off, there are a few requirements for what I'm about to tell you. You must have DHCP based cable or DSL without an authentication mechanism like PPPOE. You must have Windows 2000 or newer with two NICs. Your cable modem must be bridged or otherwise setup so that your NIC will be assigned the public IP address directly from your ISP upon being connected (Not NAT'd through your modem and given a private IP). You'll also need a crossover cable. Got all that? Then read on...
- Connect an ethernet cable from your modem to NIC1 on your server.
- Connect a crossover cable from NIC2 on your server to the WAN port of your router.
- On NIC1, Right click -> Properties -> Advanced -> Check the box for Internet Connection Sharing.
- Assuming your router, NIC1, and NIC2 were all set for DHCP, you should now have a server with a public IP address and your home network should still allow all the rest of your machines to access the internet. If you have problems getting the addresses assigned, trying rebooting your router and/or the server. You can also try using DHCP release/renew commands.
- First off, there are a few requirements for what I'm about to tell you. You must have DHCP based cable or DSL without an authentication mechanism like PPPOE. You must have Windows 2000 or newer with two NICs. Your cable modem must be bridged or otherwise setup so that your NIC will be assigned the public IP address directly from your ISP upon being connected (Not NAT'd through your modem and given a private IP). You'll also need a crossover cable. Got all that? Then read on...
Happy gaming!
Tuesday, January 13, 2009
Playstation to USB Adapter for PC
Testing the Playstation to USB Controller Adapter

You can find these adapters on eBay (usually direct from Hong Kong) for less than $8 including shipping. It was so cheap, I decided to buy one and test it out. On to the tests!
The Test System:
- MSI AM2 Motherboard
- AMD Athlon X2 Processor
- Windows XP SP3 (32bit)
- PCSX2 Playground v1.0.0395 VM
- ePSXe v1.7.0
If you're reading this article you're probably a ePSEe or PCSX2 user looking for an easy way to get a controller working with the emulator. You'll be happy to know this cheap little device allows you to use two Playstation controllers at once, as advertised. I was even able to use my Red Octane Guitar. HOWEVER, it did not like every controller I tested, and the driver CD they shipped with the unit didn't help. All of these controllers were first tested on my Playstation 2 console before I tested them under an emulator.
 (The test equipment pile)
Hardware Compatibility
So which controllers worked and which didn't?
- Sony PS2 Dualshock 2 (SCPH-10010) FAIL
- Sony PSX (SCPH1080) PASS
- Verge Micro PS2 (VGP2MCONT) PASS
- Red Octane Guitar (PSLGH) PASS
- Madcatz Wireless PS2 (8246) FAIL
I should note that while the guitar worked, Rock Band doesn't run properly under PCSX2. Perhaps with some tweaking I can get the emulator to see it as a guitar and get the blank menu options to appear, but I don't have the time.
Tip: Things seem to work the best if you plug the USB cable in first, then both controllers, then start the emulator.
Other Uses:
I also found that a Playstation controller with this USB adapter works great for the following other emulators:
- Stella v2.3.5 (Atari)
- Project 64 v1.3 (N64)
- FCE Ultra v0.5 (NES)
- Snes9X v1.41-1 (SNES)
- Gens v2.14 (Genesis)
http://www.epsxe.com
http://www.pcsx2.net
http://www.ngemu.com
Saturday, January 10, 2009
AMD Athlon X2 upgrade
In a previous post, I described the Pentium 4 architecture I was using and how it appeared to be nearing obsolescence.
http://purefinity.blogspot.com/2008/12/pentium-4-architecture-becoming.html
Well with the incredibly cheap prices in 2009 (ie: $35 for 4GB of RAM) , I thought it was a good time to upgrade.
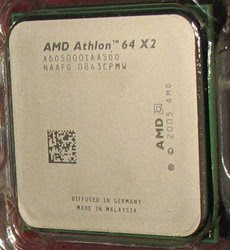
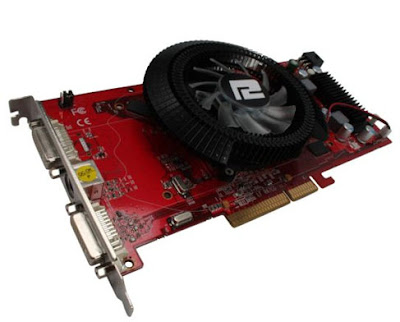
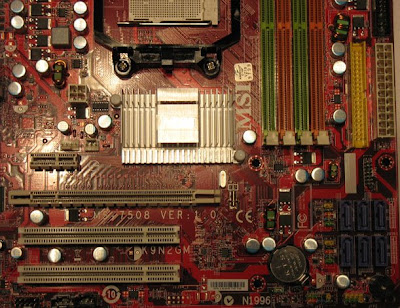
AMD Athlon X2 5000, MSI K9N2GM, Powercolor Radeon HD 3850 PCI-E (688mhz clock, 747mhz RAM), 4GB DDR2 800 RAM
Left4Dead 1024x768 + low settings - 66FPS (19FPS with 8200 on-board video)
LAME MP3 Encoding w/ defaults - 22sec
7zip ultra comp + AES256 encryption - 1m15s
Doom 3 (1280x1024, Ultra Quality, 4x AA, 8x AF) - 118FPS
The Doom 3 score actually exceeded my expectations. :-)
http://www.tomshardware.com/charts/gaming-graphics-charts-q1-2008/Doom-3,560.html
Old P4 / 6600 GT AGP
Left4Dead 1024x768 + low settings - 30FPS
LAME MP3 Encoding w/ defaults - 30sec
7zip ultra compression + AES256 encryption - 1m55s
Torture testing:
System temp was 44 deg C during torture testing.
AMD Athlon X2 5000 (Highest observed temp 53 deg C - 100% util @ 2600mhz for 1 hour)
Max Temp 55-68 Deg C
http://products.amd.com/en-us/DesktopCPUDetail.aspx?id=40&f1=&f2=&f3=&f4=&f5=&f6=&f7=&f8=&f9=&f10=
ATI Radeon HD 3850 (Highest observed temp 68 deg C - 100% util @ 688mhz for 1 hour)
Max Temp Unknown, but 75 Deg C is known to be stable according to some reports
http://www.xbitlabs.com/articles/video/display/radeon-hd3870-hd3850_13.html
The motherboard chipset is on par with similar chipsets from other vendors
http://www.tomshardware.com/reviews/amd-nvidia-chipset,1972-16.html
AGP lives! The ATI 3850 AGP performs about the same speed as the 3850 PCI-E
http://www.tomshardware.com/reviews/ati-agp-3850-agp,1939-4.html
The shader seems to have issues in certain games like Left 4 Dead where reflective surfaces look magenta or oddly reflective. Hopefully this will be fixed with future drivers from ATI.
Update:
The K9N2GM motherboard (AKA K9N2GM-FD) does not support Linux when using the SATA controller. This is a shame, but thankfully I was able to run Windows XP x64 with VMware Workstation 5.5 to use my Linux applications.
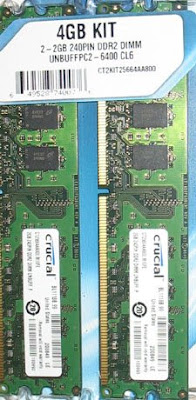
I've since bought 2 more sticks of Crucial RAM, and now have 8GB of memory running in dual channel mode. So far I have not run into the 7GB limit the user manual mentions.
The processor is now running at about 2.95Ghz and is cool and stable. (226x13)
The video card was overclocked in the BIOS to run a 695Mhz GPU clock and 828Mhz memory.
http://purefinity.blogspot.com/2008/12/pentium-4-architecture-becoming.html
Well with the incredibly cheap prices in 2009 (ie: $35 for 4GB of RAM) , I thought it was a good time to upgrade.


Performance testing:
AMD Athlon X2 5000, MSI K9N2GM, Powercolor Radeon HD 3850 PCI-E (688mhz clock, 747mhz RAM), 4GB DDR2 800 RAM
Left4Dead 1024x768 + low settings - 66FPS (19FPS with 8200 on-board video)
LAME MP3 Encoding w/ defaults - 22sec
7zip ultra comp + AES256 encryption - 1m15s
Doom 3 (1280x1024, Ultra Quality, 4x AA, 8x AF) - 118FPS
The Doom 3 score actually exceeded my expectations. :-)
http://www.tomshardware.com/charts/gaming-graphics-charts-q1-2008/Doom-3,560.html
Old P4 / 6600 GT AGP
Left4Dead 1024x768 + low settings - 30FPS
LAME MP3 Encoding w/ defaults - 30sec
7zip ultra compression + AES256 encryption - 1m55s
Torture testing:
System temp was 44 deg C during torture testing.
AMD Athlon X2 5000 (Highest observed temp 53 deg C - 100% util @ 2600mhz for 1 hour)
Max Temp 55-68 Deg C
http://products.amd.com/en-us/DesktopCPUDetail.aspx?id=40&f1=&f2=&f3=&f4=&f5=&f6=&f7=&f8=&f9=&f10=
ATI Radeon HD 3850 (Highest observed temp 68 deg C - 100% util @ 688mhz for 1 hour)
Max Temp Unknown, but 75 Deg C is known to be stable according to some reports
http://www.xbitlabs.com/articles/video/display/radeon-hd3870-hd3850_13.html
The motherboard chipset is on par with similar chipsets from other vendors
http://www.tomshardware.com/reviews/amd-nvidia-chipset,1972-16.html
AGP lives! The ATI 3850 AGP performs about the same speed as the 3850 PCI-E
http://www.tomshardware.com/reviews/ati-agp-3850-agp,1939-4.html
The shader seems to have issues in certain games like Left 4 Dead where reflective surfaces look magenta or oddly reflective. Hopefully this will be fixed with future drivers from ATI.
Update:
The K9N2GM motherboard (AKA K9N2GM-FD) does not support Linux when using the SATA controller. This is a shame, but thankfully I was able to run Windows XP x64 with VMware Workstation 5.5 to use my Linux applications.
I've since bought 2 more sticks of Crucial RAM, and now have 8GB of memory running in dual channel mode. So far I have not run into the 7GB limit the user manual mentions.
The processor is now running at about 2.95Ghz and is cool and stable. (226x13)
The video card was overclocked in the BIOS to run a 695Mhz GPU clock and 828Mhz memory.
Subscribe to:
Posts (Atom)